
Navigating the setup of Azure infrastructure can sometimes feel overwhelming due to the plethora of configuration options available for each service. This article aims to streamline this process by introducing Application Security Groups (ASGs), a tool designed to simplify the management of network Azure security groups within your environment.
Getting Started with ASGs
To dive into the world of ASGs, ensure you have an active Azure account. Begin by visiting the Azure Portal, signing in, and proceeding to the ‘Application Security Groups’ section. A quick way to find this is by using the search function on the Azure dashboard, typing in ‘application security’.
Understanding Application Security Groups
Before we delve into setting up ASGs, it's crucial to grasp what they are and their utility. If you're acquainted with concepts like ‘network groups’ or ‘aliases’ from traditional on-premises firewalls, you'll find ASGs familiar. Azure ASGs empower administrators to efficiently manage vast numbers of services or virtual machines by grouping them. This grouping mechanism mirrors the network groups or aliases used in on-premises firewalls but with greater flexibility.
ASGs break the limitations found in traditional firewall aliases or network groups. They offer a streamlined approach to managing Azure services, allowing for the easy grouping of services that require specific network permissions. This means, that rather than individually configuring firewall or network security group rules for each service, you can group services requiring similar access into an ASG. Then, simply use the ASG name to set up the necessary permissions. This method not only saves time but also enhances the manageability of network permissions within Azure.
Setting Up Your First ASG
Now that we've covered the basics, let's walk through configuring a sample ASG. This practical step will illustrate the ease with which you can manage network security in Azure, leveraging ASGs to bring traditional security best practices into the cloud.
By integrating ASGs into your Azure security strategy, alongside leveraging MDR services, solutions, and providers, you can ensure a robust defense for your cloud infrastructure. ASGs represent just one facet of a comprehensive Azure security plan, highlighting the platform's commitment to flexible, powerful security management tools.
Setting up infrastructure in Azure can, at times, seem quite daunting with all of the available options one can configure within each service. In this blog, we will give you some tips for applying traditional security best practices into your Azure environment using Application Security Groups to help make managing network security groups less cumbersome.
The Azure Application Security Group blade home dashboard should resemble the following screenshot.
Azure Application security group home

The first thing we’ll do is click on ‘Create application security group’ to start the configuration process. Once we do that, a new window appears requesting additional information such as the ‘Subscription’ name, and the ‘Resource group’ name, and asks us to choose which region we want to deploy this service. In the example below, we are creating an Application Security Group named ‘AttackLab’. Make sure you complete each field as all four are required. Once happy, either click ‘Next: Tags >’ or ‘Review + Create’ if we’re finished. For the sake of this example, we can click ‘Review + Create’. In an actual production environment, we would want to apply metadata tags appropriately so we could track this service more easily in a large environment.
Create Application security group dialogue

Assuming the validation phase passed, we can click on the ‘create’ button at the bottom of our browser window to create the Azure Application security group. Once Azure finishes provisioning our Application security group, we can begin to assign other services to it.
Let’s say you have several Azure VMs you need to group into the newly created Application security group for easier management of inbound traffic allowance rules. Choose an Azure virtual machine and navigate to its ‘Networking’ blade. Within this blade, we can select the ‘Configure the Application security groups’ button and configure those settings. As an example, the Networking blade for the ‘AttackLab-MB-VM’ VM is presented in the following screenshot:
Networking options within a VM

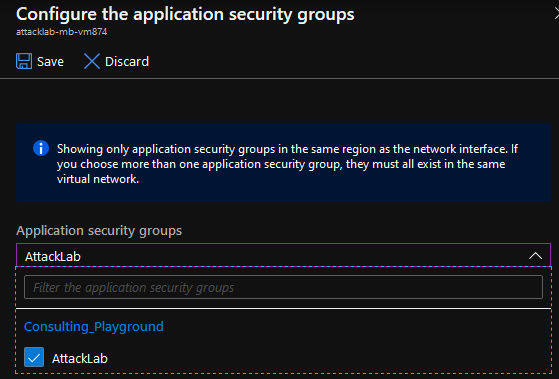
Adding a VM to an Application security group is rather easy. Just select the Application Security Group or groups to which you want the VM or service to belong and click ‘save’. In the following screenshot, the VM is added to the ‘AttackLab’ Application Security Group:
Select the application security group
So, we have our Application security group or groups created, we’ve assigned VMs or other services to the Application security group or groups, and now we’re ready to see how to implement this in the Network security group service. It’s actually pretty simple to use the Application security group in inbound or outbound rules as demonstrated below under the Inbound rules blade for the network security group.
NSG configuration using Application security group
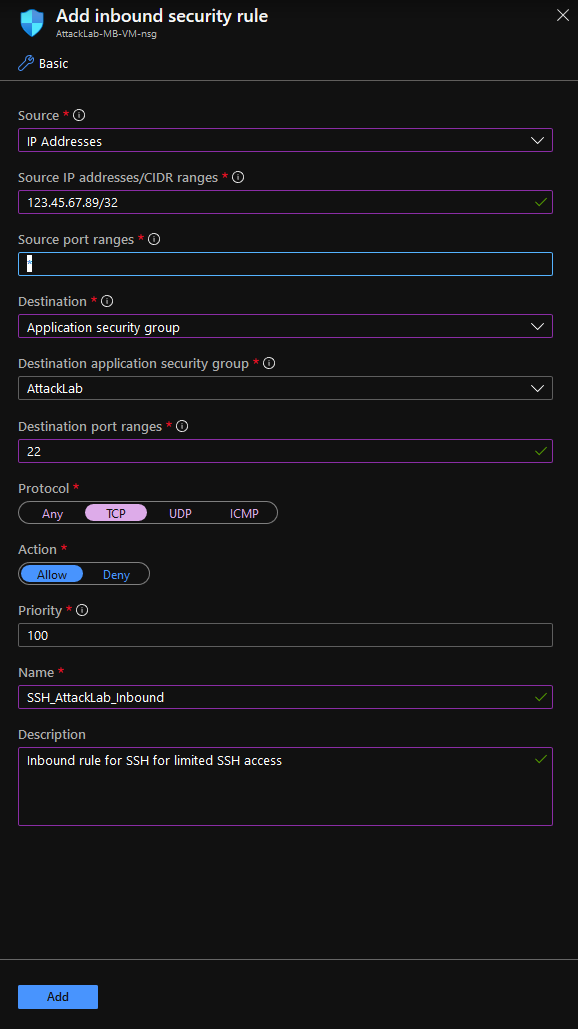
In the above example, we’re allowing SSH inbound from a specific IP address (redacted from the image) to all hosts in the ‘AttackLab’ Application security group.
Learn more about Application security groups
Frequently Asked Questions